Use this guide to learn the following:
What are ContexTiles?
ContexTiles are part of Trendemon's features to support GEO (Generative Engine Optimization) . It is also a part of a stand-alone product we offer called Signal (click here to learn more).
These are AI-powered personalization units designed to enhance engagement with your content. Each ContexTile includes these main sections:
- AI Page Summary – Provides a short, concise summary of the page’s content, helping visitors quickly understand what the page is about.
- On-Page Chat – An interactive Q&A interface powered by LLM. Visitors can ask any question — whether about the current page or other product-related topics — and receive instant, accurate replies along with suggested follow-up readings.
- Guiding Questions - Proactively guide visitors with a set of relevant, pre-curated questions. Visitors can click on a question to instantly receive a reply that you have approved, helping them to quickly find the information they need.
- CTA button - add a call-to-action button at the top of the widget, and refer visitors to a specific page. Common example are: Book a meeting, See a demo, Talk to us.
ContexTiles has 2 layout options:
Embedded

Overlay


All chat interactions are logged, allowing you to review the full Q&A history and uncover valuable insights into buyers’ intent, and understand what your target visitors are looking for.
Setting up ContexTiles
Create a new ContexTile by navigating to Activate > Page-Level > ContexTiles, and click on “Create New”:

Under the Customize section, you can select the contextile layout (embedded / overlay), edit the ContexTile title, adjust colors and font size, update the dialog box text and make additional style changes. You can also choose which sections of the ContexTile — AI Page Summary and On-Page Chat — to show or hide.

In this section you also have an option to display guiding questions (read more about this option here)

You can also add a call-to-action button at the top of the widget, and refer visitors to a specific page.
Common example are: Book a meeting, See a demo, Talk to us.

In the Settings section you define which audiences or segments should see the ContexTile unit, and on which pages and devices it should be displayed.

On the publish section you can save the as draft or publish.
If you're ContexTile layout is embedded. then the Publish section works similarly to any embedded campaign. Here you can access the embed div for the ContexTile or select an embed group to display this unit across multiple pages. You can also use Auto Embed Group to automatically insert the group div into multiple pages at once.
Click on “Save and Publish” to activate your new ContexTile unit.

ContexTiles Pool
This pool includes the pages used to generate replies in the chat interface. The content from these pages is processed by the LLM and serves as reference material when answering visitors’ questions. This means that visitors can use the chat to ask about any topic — not just content from the page they’re currently viewing. For example, a visitor reading a blog post can ask about product pricing, and the chat will instantly provide an accurate answer using information from the Pricing page — without the visitor needing to leave the blog post or navigate elsewhere.
You can manage the pages included in the pool by navigating to Configure > Agentic Settings > AI Content Pools.
Here you can see all the pages that are automatically included in the pool. By default the pool includes 1,000 pages that have the highest number of pageviews in the past 30 days.

You have an option to override the default definition of top 1,000 pages by pageviews, and define which content you want to include in the pool based on areas and page tags. To do so click on the "Scan Rules" button:

Select the option of "from specific website sections", and select the areas or page tags that you want to include in the pool. Then do the same for the areas and page tags you want to exclude form the pool:

You can also add to the pool content that don’t include the Trendemon tag. This content will be incorporated into reply generation and recommended next reads.
To add content that doesn't have Trendemon's tag, click “Add Content”, and select one of the following options:
-
Add page or PDF URL - for webpages that don't have the Trendemon tag or urls of PDF files. Paste the url, and click on the "Add" button

-
Upload PDF - to upload a PDF from your device. Click on "Select PDF", upload your file, and click on "Add".

You can also perform this actions from the main pool manage screen:
Remove content from the pool by clicking on the “Remove from pool” icon:

You can restore removed pages by filtering the table on “Removed Content” and clicking on “Restore to pool” icon:

You can edit pages that already exist in the pool by clicking on the page title:

and updating the title and the image:

Guiding Questions and Q&A Pool
Guiding questions allow you to proactively guide visitors with a set of relevant, pre-curated questions. Visitors can click on a question and instantly receive a reply that you have approved, helping them quickly find the information they need.

The Q&A Pool is where you manage approved answers and decide which questions should appear at the bottom of the ContexTile widget as guiding questions. You can access this screen by navigating to Configure > Agentic Settings > Q&A Pool.

Q&A Table
Each row in this table represents a question and answer pair. The table also shows the source of the question, indicating whether it was added manually by a user or automatically generated by the system. You can view the audience and segment tags assigned to each question, which determine which visitors will see it. If the question is linked to a specific source page and the reply is intended to lead visitors to that page, the source page will also appear in the table. In addition, you can see the answer status (Pending or Approved), the guiding question CTR from the past 30 days, and an indication of whether the question is currently set to appear as a guiding question in the ContexTile unit.
Edit Q&A
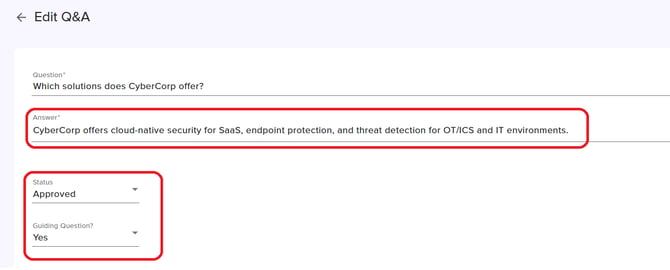
You can edit a specific Q&A by clicking the question text marked in blue:

From this screen, you can update and approve the reply. After approval, you can decide whether the question should appear as a guiding question in the ContexTile widget.
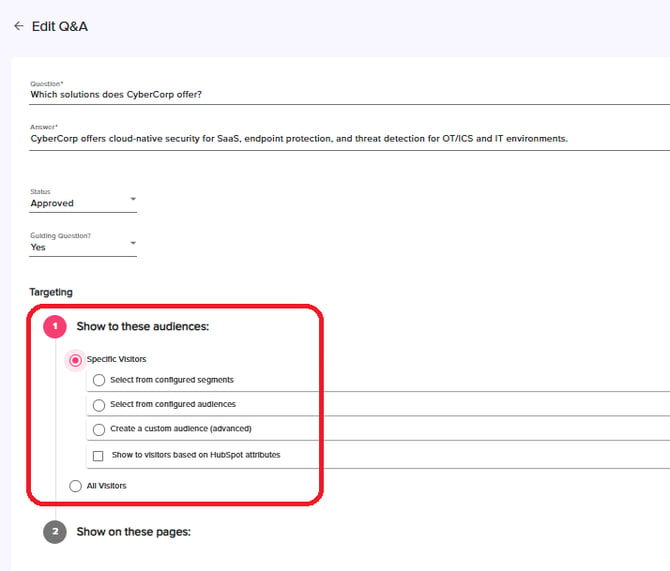
You can also assign the guiding question to be displayed only to specific audience /segment:
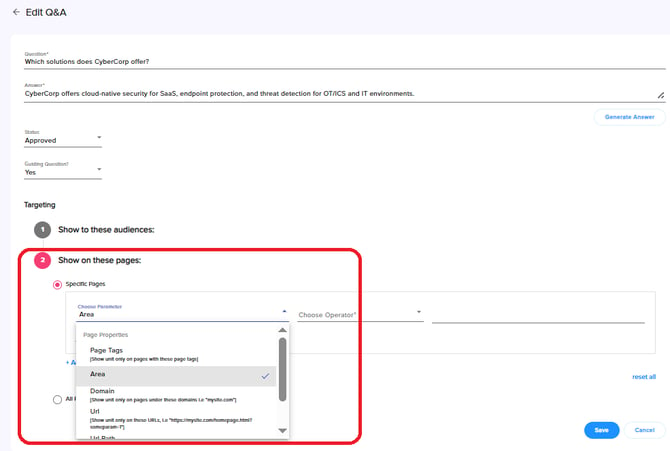
And display the guiding question only on specific pages:
Approved Answers vs. Guiding Questions
Think of Approved Answers as your system’s brain. Once you approve a Q&A, the AI is authorized to use that information to provide accurate, on-brand responses whenever a visitor asks about it. Guiding Questions are the UX choice. You can take any approved Q&A and highlight it as a clickable prompt to actively lead the conversation. This gives you total flexibility: you can maintain a deep library of approved knowledge for the AI to draw from, while only surfacing the most critical questions to keep your chat interface clean and focused.
Initial Grounding Questions
The system automatically generates 20 initial grounding questions based on your content, such as integrations, pricing, and product features. These questions are marked as Source = System Generated. You can review the generated answers, approve them, and identify potential content gaps. If the system cannot provide a strong answer due to missing information, this highlights areas where additional content may be needed. After approving an answer, you can also choose to add the question as a guiding question in the ContexTile unit.
Add New Question
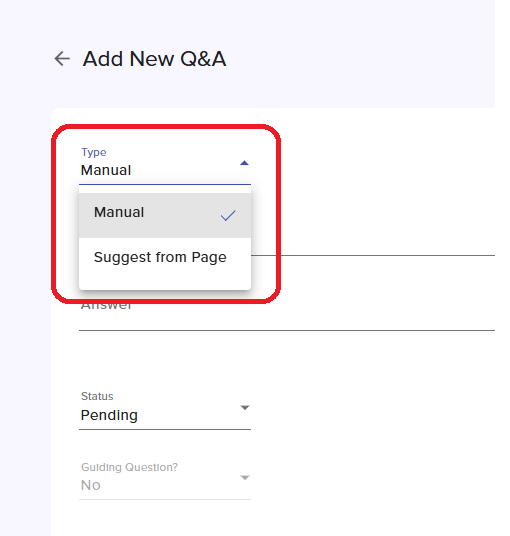
Click the "Add New Question" button to manually create a new Q&A pair.

In this screen you can manually type in your question and answer, or alternatively - you can provide a page URL, and the system will automatically generate a relevant Q&A designed to drive traffic to that page.
From this screen, you can also update and approve the reply. After approval, you can decide whether the question should appear as a guiding question in the ContexTile widget.
You can also assign the guiding question to be displayed only to specific audience /segment:
And display the guiding question only on specific pages:
Configure System Generated Questions
Trendemon analyzes which content drives real business outcomes, from MQLs and SQLs to closed-won deals. By evaluating engagement signals such as read rates and proceed rates across the buyer journey, the platform identifies the content that resonates most with buyers at each stage. These insights are used to automatically generate guiding questions that direct visitors to high-performing content.
By clicking the "Configure System Generated Questions" button, you can define how often the system should generate new Q&As that lead visitors to top-performing pages. From this screen, you can enable or disable this feature, select the generation frequency, determine how many questions should be created each time, choose which areas of content should be analyzed, and define the logic used to identify top-performing pages (such as conversion performance, engagement, or new content).


Add Guiding Questions to the ContexTile Widget
After marking questions to appear as guiding questions from the Q&A pool screen, you can add them to your ContexTile widget configuration. Navigate to Activate > Page-Level > ContexTile and select the unit you created. Under the Customize section, you can define the title of the guiding questions section and determine how many guiding questions should be displayed.
Trendemon will automatically display the most relevant guiding questions for each visitor based on their audience, segment, and the performance of the guiding questions.

Analyzing the Performance of Guiding Questions
Navigate to Analyze > Activate > ContexTiles in order to review the performance of guiding questions. Filter on the "By Q&As" view to see metrics for each guiding question - impressions, clicks, interaction rate (conversations/impressions), goals conversions that happened after the conversation and more. Clicking on the blue values will lead you to Explore Journeys screen where you can see additional details on the selected metric, like the list of impacted companies, journeys who converted goals and more.

Conversation Rules
Conversation rules allow you to define custom guidelines and boundaries for the replies generated by the chat interface. These rules help ensure that the chat responds in line with your brand tone, goals, and conversion paths.
For example, you can set rules such as:
- Referring visitors to the free trial signup page at the end of each answer.
- Displaying a “Book a Meeting” link when a visitor asks about demos, meeting with sales or pricing.
When should you use Conversation Rules vs. Answer Approval in the Q&A Pool?
Use Answer Approval in the Q&A Pool when you want to control or fix the reply to a specific question. This ensures that when a similar question is asked, the visitor receives the approved response you defined. Use Conversation Rules when you want to provide general guidance for how the assistant should respond across multiple questions. Conversation Rules are best suited for broader instructions or behavioral guidelines, rather than responses to a single, specific question.
In short:
-
Q&A Pool Answer Approval → For specific questions and fixed responses.
-
Conversation Rules → For general guidelines that apply to multiple responses.
In order to set up your custom rules navigate to Configure > Agentic Settings > Conversation Rules, and click on “New Rule”:

Provide a name for your rule, insert the rule’s description, and click on “Add”:

After adding your rules, you can also test the replies that will be generated based on these new rules. You can do so by clicking on the “Test Conversation” button and start to chat:

You can also pause or delete rules that are no longer relevant by clicking on the 3 dots icon:

Explore ContexTiles Q&A and Performance
There are several places on our platform where you can explore the details of chats visitors had.
1. Explore Journeys
Navigate to Explore > Journeys to review the Q&A visitors had in ContexTiles.
Use the Type filter and set it to “By AI Chats”, to display journeys of visitors that had conversations in Contextiles:

You can also view journeys with AI Chats on other views of Explore Journeys screen (By Goals, By Companies, By Connected Contacts) using the “Had Conversations” filter:

Scroll down to review the details of each visitor and his journey, and uncover the Q&A.
Pages in which the visitor interacted with the ContexTile chat are marked with a purple star, clicking on that icon will reveal the Q&A that took place on this page:

Click on the “By Conversations” tab to review all the Q&A this visitor has in his journey:

2. Scheduled Reports
We also have a scheduled report that displays all the conversation details. You can run this report on-demand, or schedule it and receive it directly to your email.
Set up the report by navigating to Configure > Reports > Create Report, and select "Journeys".
Set the report type to be "AI Chats Report". Select the report frequency, period, email and set the additional filters.

3. Analyze ContexTiles
Navigate to Activate > Analyze > ContexTiles in order to review the performance of these units.
Here you have 2 views:
* By ContexTile units:
Filter on the "By ContexTile Units" view to see the amount of impressions and conversations, interaction rate (conversations/impressions), goals conversions that happened after the conversation and more. Clicking on the blue values will lead you to Explore Journeys screen where you can see additional details on the selected metric, like the list of impacted companies, journeys who converted goals and more.

* By Q&As:
Filter on the "By Q&As" view to see metrics for each guiding question - impressions, clicks, interaction rate (conversations/impressions), goals conversions that happened after the conversation and more. Clicking on the blue values will lead you to Explore Journeys screen where you can see additional details on the selected metric, like the list of impacted companies, journeys who converted goals and more.